Showing posts with label wood craft. Show all posts

Tuesday, February 23, 2010

Walnut and Cherry Desk Clock


I, affectionately, refer to this walnut and cherry desk clock as "the little, one-eyed alien clock." :-) My wife thinks it looks like Kenny from South Park. Maybe I should call it "Kenny surfing."

The design was an experimental one and actually took a lot more work than I planned so I don't anticipate making another one. The problem was all of the sanding angles. To really bring out the quality of the grain a piece of fine woodworking needs to be sanded all the way to superfine. Because of the way the walnut and cherry fit together, as well as the shapes of both woods it made sanding a challenge.

But the end result I think looks sharp. I tried to bring a lot of curve into the shapes.

This is a great little desk clock, shelf clock or table clock. It's just under 6 inches wide by 4 1/2 inches tall and 1 3/4 inches deep. The clock itself is about 1 1/2 inches in diameter.

The clock is made from Michigan air-dried walnut and cherry woods and was finished with 2 coats of tung oil, which really brings out the rich grain patterns on both the walnut and cherry.

The walnut and cherry desk clock is for sale on my site.

Monday, July 27, 2009

Oak End Table with Stained Glass Inlay - Craft Tips on Joinery


There are lots of different joinery techniques when it comes to woodworking. Some of them are very inelegant like broad-headed nails while others are the complete opposite and the joinery is one of the nicest features of the piece, like hand cut dovetails.

I am certainly no expert on joinery, although I have tried a number of techniques.

On this end table with the stained glass inlay I used two kinds of joinery. To assemble the table legs to the aprons I used the biscuit joiner my brother gave me (thanks Scott!). I also used the biscuit joiner to join the table top together. The biscuit joiner is an easy form of joinery, but creates strong joints, plus they are invisible which makes for nice clean pieces.

If you'll notice in the pictures of the table, the aprons have a slight recess from the table legs. This element adds a bit of shadow and gives the piece some additional character versus just having the aprons flush with the legs. To achieve the recess is simply a matter of offsetting the biscuit joints on the legs and the aprons by the amount of the desired recess, in this case I believe I did 1/8 inch. That means the holes for the biscuits on the legs are 1/8 inch further from the edge of the wood on the legs than on the aprons.

The other type of joinery I used on this piece was to join the table top to the leg assembly. In wood working one thing you need to account for is wood movement in opposite directions. The stress movement creates can split joints apart. In this case it wasn't much of a concern because the table top itself is small and also because the table top isn't comprised of a single slab of wood. Still it's better to be cautious than to have a piece not hold together, so I used glue blocks. I took small pieces of oak (less than 1 inch in length) and glued them to the underside of the table top and the inside of the aprons. I also pined them in place with brads so they'd stay in position until the glue dried. Again this is a fairly simple type of joinery but it's invisible (unless you are looking at the table from underneath) and will allow for wood movement if that were to become an issue.

By the way, the glass top on this table (not the stained glass inlay, which I made) but the single piece glass top, was very expensive. It cost as much as all of the rest of the materials combined, I had to have it custom made. If anyone knows of a good source for glass with finished edges please let me know. Thanks!

Thursday, July 23, 2009

Oak End Table with Stained Glass Inlay - Craft Technique


The aprons on this oak end table are all curved, which in addition to being a nice design accent helps to keep the piece from feeling too blocky.

There is a fairly simple technique for making sure all of the aprons have the exact same curve so the piece is nice and even. To start out I took a piece of MDF (medium density fiberboard) cut the same length and width as the table's aprons will be. I use MDF because there is no need to waste good wood for a template part. On the MDF I trace out the curve I want (using a large compass to make it nice and even.

The I take my MDF template to the band saw and cut out the curve. Band saw cuts are fairly rough so it's necessary to smooth it out afterwards. Once I am satisfied with the shape of my MDF template I then trace the curve from the template onto all 4 of my oak aprons. I cut all of the aprons on the band saw as well. It's important to cut a little bit proud of the curve line - in other words leave a little extra, don't cut right to the line. Once I have all of my aprons cut I can then match them up to the MDF template one by one.

I clamp 1 apron to the template at a time and use a flush trimming router bit to finish the apron curve. The router bit uses my MDF template as a guide and cuts the actual apron to an exact match of the template. By doing this with all 4 aprons they end up being an exact match of each other.

Monday, July 20, 2009

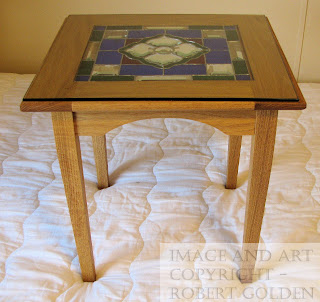
Oak End Table with Stained Glass Inlay


I like this piece for the bold color in the stained glass, yet the practicality in its use. This is a fully useable end table, with a 1/4 inch piece of glass over the top to protect the surface. I really like making useable pieces, this way my work isn't just decorative, it's also functional craftsmanship.

I visualize this as being the perfect piece to site between a pair of arm chairs and having a lamp sit on top of it - preferably a stained glass lamp :) The table top is 19 inches by 18 inches and the table stand 19 inches high.

The stained glass piece is focused around the center bevel cluster. It may be a little hard to tell but all of the clear glass, which in these pictures appear white because of the background, are all beveled glass pieces. The pattern is a fairly simple geometric pattern that I designed that I feel makes the piece beautiful without being too busy.

The legs are tapered on two sides to keep the table from feeling blocky. Also the table aprons all have a gentle curve to keep the table looking light as well.

The oak table is finished with tung oil to bring out the natural grain of the wood. Tung oil is a great finish for pieces where you don't want to add stain but still want the wood grain to really stand out.


Monday, July 13, 2009

Victorian Stained Glass Light with Tooled Leather Crest


This is one of my favorite pieces to date. It integrates all 3 mediums I like to work in, wood working, stained glass and tooled leather. It is also pretty substantial in size, standing in total just over 3 feet, which makes it fairly dramatic.

The wood for this is oak, with a decorative moulding and a dark stain. The piece is hung via a french cleat and the moulding makes it flush with the wall. The stained glass actually sits in a routed curve on the base which helps hold it in place.

The tooled leather top is done in something of a sunburst pattern, which ties it in with the light below. The leather makes it look either as though the sun were illuminating the stained glass or the whole piece is a candle, which is kind of fun.

With this piece I moved into working in 3 dimensions with stained glass, the entire stained glass piece is actually a half cylinder about 4 inches in diameter. This roundness of the stained glass brings it out and allowed me to backlight it with a string of LED lights (very energy efficient and have a life span of about 50,000 hours). The are over 300 individual pieces of glass in the stained glass cylinder which is done in a Victorian style.

During the day time all 3 elements of the piece work together, the wood craft, the tooled leather and the stained glass. At night the backlit stained glass really glows and changes the dimension of the piece into something even more dramatic.

Saturday, July 11, 2009

Welcome to Robert’s Workshop


Welcome to my workshop blog. The blog will feature the work of Robert Golden artist/craftsman. I work in wood, stained glass and hand carved leather. My goal with my pieces is to create functional art, that is both beautiful and useable. I try to blend the wood, stained glass and leather together in my pieces to create truly original work.

As you’ll see from the different pieces I share I don’t limit myself to particular styles of work. I really like to explore the creative boundaries of what I can come up with that incorporates these 3 types of medium.

In the posts in my blog I will talk about individual pieces. I will share tips & techniques, talk about the tools I use, even have some videos of me working on pieces.

Thanks for stopping in and I hope you enjoy my work!

-Robert Golden